Friday, March 19, 2010

Pajama Pants


I finally got around to finishing these pajama pants! I started them about 2 months ago and have been procrastinating finishing them. I have to make my own pjs because I have long legs and I want long pjs! I ran into a lot of issues while making them also. That's what I get for my first shot alone. Usually my mom is close by for guidance. I still had to call her a few times!

The first problem was when I cut the fabric. I didn't fold the fabric right so I ended up having two left legs.... that doesn't work well. My mom suggested just having one leg inside out, but I'm too picky about my pjs even though no one sees them.

I went back to the store and of course they didn't have anymore of the original fabric I bought so I scraped the original pattern (similar blue with polka dots) and now have it for possible inventive projects (maybe i'll try and make bean bags with numbers.... hmmm...).

Then I was going along fine until I reached the waistband (I know, so close to the finish line!!). I don't know how I did it but I measured the elastic about 6 inches too big.... who even knows. This wouldn't have been so bad, except I had actually sewn the elastic to the pants instead of threading it through. So my hubby was nice enough to take out the stitches (he kind of likes doing that) and I cut down the elastic and went with threading it through this time. Then I finally hemmed them and they turned out pretty good.

The only other thing is I think I used a bigger size then I really wanted, but it just means the legs are a little baggier then I'm used to. Atleast the waist fits now!!!
Posted by Picasa

Thursday, March 18, 2010

Bean Bags

I made a set of 10 bean bags for my Relief Society service auction tonight. I had made bean bags for my son a few months ago, so I just used left overs to make them. I also made a bag to put them in using the same template from previous post. I just made a smaller version and luckily it worked out just fine. The only part that didn't work out so well is that the drawstrings were a little shorter then they probably should have been.  It was fun making them and I was glad to be motivated to use my sewing machine again. They also sold for 100 fake dollars :)

Sunday, March 7, 2010

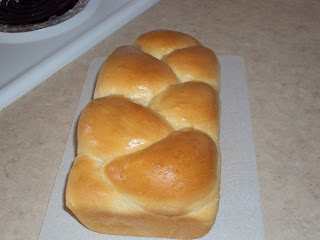
Swiss Bread


Don't ask me why its called swiss bread, but this is a recipe I got from one of my culinary arts classes at BYU-Idaho. If you look at the end result it looks amazing, but its actually really simple to do. You can even use your own bread recipe and shape it into a braided loaf. And if your not daring enough to try braiding this recipe, you can always shape it like a regular loaf. I triple dog dare you to try it though :) Your guests will be super impressed. The original recipe is double, but I have a hard time fitting it in my kitchen aid.


Swiss Bread
BYU-Idaho Baking Class Summer 2007

Combine these ingredients and beat until smooth:
· 1 cup scalded milk (heat until just steaming and then cool to 110 Degrees)
· 1/2 tbsp active dry yeast (dissolve in 1/4 cup water at 110 degrees)
· 1 1/2 tbsp sugar
· 2 tbsp oil
· 1 cup all purpose flour

Allow sponge to rise until double in bulk (about 30-45 min).Then add:
· 1 egg beaten
· 1 tsp salt
· 1 cup of flour

Mix with a dough hook and add more flour gradually until dough pulls away from side of the bowl (using kitchen aid mixer). Dough should be soft but not sticky.
From this point you can form dough into whatever loaf you would like; directions for braided loaf below. You may have a little extra dough. Then place loaf in well greased bread pan. Brush with weak egg wash of 1 egg and 3 tbsp water. Let rise until about 1 inch over top of pan or double in bulk. Back at 325 degrees for 30-35 minutes.
Braided loaf:
Weigh the double into 8 oz portions (you can also just divide loaf into 3 equal portions). Round the balls of dough and then form three 12” rope. Braid the ropes loosely, sealing the ends. (SEE BELOW)

Yield: about 1 loaf of bread (maybe a little more)


Round the balls of dough and then form three 12” rope.
Braid the ropes loosely, sealing the ends
It is a 1 1/2 lb loaf, so I think my pan is and 8 inch pan. Sometimes it can make a 2 lb loaf, depending on the amount of flour needed. Just kind of tuck the ends underneath to make it look nice and even.
Posted by Picasa

Monday, February 8, 2010

Scrapbooking Weekend

I spent alot of my spare time this weekend catching up on scrap booking. It was quite productive!! I've caught up and I just need to print two pictures (Landon at 11 and 12 months old) for the last pages I worked on and scrapbook Landon's birthday.
This page was a combination of using the cricut and sticker letters. Since I wanted so many letters on these pages, I opted for stickers since I don't have to glue the back of each letter. I used the cartridge Stretch Your Imagination for the cricut shapes.
We spent Christmas week in Washington with both our families so we had lots of pictures with family. I only used the cricut for Create Joy (Beyond Birthdays Cartridge) the rest are store bought embellishments my husband bought me for Christmas. It was a struggle planning this page since I wanted to include so many pictures, but I'm really happy with how it turned out.
The Christmas page includes store bought embellishments but I used three cartridges total for the two pages. Beyond Birthdays for Christmas, Stone Script for Snow Day! (you can't really see it in the picture) and the snowman and sled were from Stretch Your Imagination.
I took pictures of Landon each month around the 17th and I wanted to include this in his scrapbook. I also included some of his gross motor milestones on it. I used Teardrop for the text.
Posted by Picasa

Monday, January 25, 2010

Amazing Breadsticks

This is my husband's favorite! He wishes I would make them everyday and the best part is they are super easy to make. They only take about an hour start to finish. You can make them plain, with garlic butter, or with cinnamon for a sweet treat.


Breadsticks

Dissolve:  1 tbsp yeast in 1 ½ cups warm water
Add:
  • 1 tbsp brown sugar or honey
  • 1 tsp sugar
  • 4 cups flour

Knead five minutes. Roll into a rectangle. Cut into strips. Melt 1/4 cup margarine and pour into pan with sides at least 1 inch tall. Place strips on pan. Let rise 20 minutes. Sprinkle with salt or other seasoning. Bake at 375 degrees for 15 to 20 minutes. Once recipe makes 24 bread sticks. For my husband and I I usually make half a batch.

Garlic Bread sticks: Use garlic butter in pan and sprinkle with garlic salt.
Cinnamon Bread sticks: Sprinkle cinnamon sugar on pan after melting butter and then after baking brush with butter and then more cinnamon.
Posted by Picasa

Friday, January 8, 2010

Drawstring Bags

I decided to make drawstring bags to hold some of my son's toys like blocks and the bean bags that I made. I found this pattern at here and altered it a little bit. I didn't like how much fabric was above the drawstring so I shortened that part a little bit. This is a great handy project especially for new sewers like myself.

To make this bag:
1/3 yard of 44-45" fabric
2 30" ribbon ties (I used shoe laces or you can make the drawstring out of the same fabric)


Cut the fabric 35 1/2" by 12 1/2". Turn under each edge 1/4" and press. Now fold in half with good sides together and your fabric should measure 17 1/2" by 12 1/2". Measure 14" up the side and mark. Measure 1/2" and mark also. Sew (1/4" seams) up sides to the 14" mark leave 1/2" open and then finish sewing the last 3".


Now press open the seams you just stitched.

 Now you are going to fold the top edge down 2" and sew right next to the edge. This should be a little below opening on the sides. Once you've sewn this edge, sew a little above the other side of the 1/2" opening.


           Turn bag right side out. Attach a saftey pin to the ribbon or fabric tie (if you are using shoe laces, the ends are already stiff enough). Thread the ribbon through the opening on one side all the way around until it comes out the same side you put it in. Do the same on the other side. Tie the ends and you have a drawstring bag!

Posted by Picasa

Tuesday, January 5, 2010

Christmas Thank You Cards

I'm really into browns, greens, and blues. It helps that green is my favorite color. The first two pictures I made for Thank You cards for christmas. I like the first picture because they could have also been used for most anything. The last picture is a card that we made to send to a family member having a hard time. I used my Cricut for these cards. It really makes card making and scrapbooking fun. I used the Beyond Birthdays cartridge and the Home Accents Solutions cartridge.


Posted by Picasa